Friday, December 26, 2014

Job 4: Cleaning & Waxing

This is one of the bigger jobs and one that will make a huge difference in the game's performance and appearance.  First, I needed to strip the playfield of all the major components and light bulbs.


I made sure to lay out all the removed pieces in their relative positions to make re-assembly easier. The rubbers were so old and out of shape that if they didn't crumble right off their posts, they held their shape. There was no bounce left in any of them.


Here's what I found in the corners of the stripped playfield - years of dust, grime and gunk.


I started with a basic de-greasing cleaner and a clean cotton rag to get the major grime off, used Novus 2 and 3 for the next levels of dirt and touched up with rubbing alcohol and a Magic Eraser for the gunk that was stuck between the grains of wood.  Then, while I cleaned the posts and plastics with Novus 3, everything got three coats of carnuba wax.  


The brand new flipper bats are installed and all the plastics were added back into place with brand new rubber parts.


Look at that shine!  Beautiful once again. And I love how the old off-white posts contrast against the new white rubbers.


Wednesday, December 24, 2014

Job 3: New Lightbulbs

My Marco order arrived and the first order of business is replacing all the dead bulbs.  It makes a huge difference!


Monday, December 22, 2014

Job 2: Spin Relay


The main feature of Fun Land is the spinners, which do a lot of different things. They're the main gateway to the top of the playfield, making them an important target during the game. Activating the spinners also advances the arrows around the dial in the center of the playfield.


If the arrow stops on a lighted number, it scores a free game. This feature works fine. The spinners also score points of their own, alternating between 5, 50 or 500 points (as indicated by lighted inserts). This feature did not work and it didn't take long to figure out why.


This mechanism is the spin relay and Fun Land has two of them. One controls the arrow lights and the other one (the broken one) controls the spinner scoring and score lights. When the spinner spins it moves a leaf switch, which activates a magnet on the relay. The magnet pulls and releases a metal armature with a claw on the end, which turns a plastic gear attached to a pair of contacts on a printed circuit board. Changing the position of the contacts changes which lights are lit and what score is added.  It's a very clever piece of engineering.


I looked at the working one and I looked at the broken one and realized that the claw part of the armature had broken off. I was incredibly lucky because the broken bit was sitting on the bottom of the cabinet. I wish I had taken "before" photos.

I first tried super glue but that barely held. Next, I used some stronger stuff - JB Weld adhesive epoxy  - and it didn't work much better. Then I had the brilliant idea to splint the broken piece on with some metal wire, so I put down a layer of the epoxy, pressed two short wires over the fissure, and covered them with more epoxy. When it was dry, I did the same thing to the back.  There were two problems with this: first, the wires on the bottom were hitting the magnet, preventing the armature from moving completely and it wouldn't push the gear. Second, the wires were too short and the piece broke off again after only a few spins. But I felt I was on the right track, so on the fourth attempt I epoxied one long wire to the top, close to the inside and another long wire on the back near the edge, away from where the magnet hit.


Success!  This arrangement has held up ever since and the spinners now work perfectly! I had the wire already and spent about $5 on epoxy - so much better than buying a new armature online for $14.50.

Saturday, December 20, 2014

Job 1: Small Stuff


I've made my first assessment of my Fun Land pinball machine and was at last ready to make my first parts order. I checked out Pinball Resource and Bay Area Amusements but, even though they're a little more expensive, Marco Specialties was the only resource that had everything on my list and I know from experience that they're lightning fast and highly dependable.  Here's my shopping list:

  • 50 #44 bulbs
  • Game-specific rubber ring kit
  • Game schematic
  • Felt cabinet protectors (that go between the legs and body)
  • A leaf switch blade
  • A set of leg levelers
  • New acorm post caps for the plastics
  • Two keyless latch locks
  • A pair of plastic flipper bats
  • A bag of 100 4" cable ties

While I was waiting for the order to arrive, there were a few small things I could do. First, I disconnected the tilt mechanism.


I tried adjusting it first, but that thing is so sensitive that I ended up unscrewing the wire and disabling the whole thing. Now I can play a decent game.

Next, I set out to clean the contacts. The best tool for the job is good old fashioned US currency - the linen paper has just the right texture and weight. Just fold it up, slip it between the contacts, press them together, and pull the paper out. So how dirty were my leaf switches? Here's Abe before I started:


And here he is after cleaning all the contacts:


It's amazing what a difference clean contacts make. Bulbs that I thought were dead came back to life and features that I thought I'd have to take apart started working. Finally, it was easy enough to create new instruction cards, so I got that done too.


Thursday, December 18, 2014

Assessment Part 2


The next step would be to have a look inside the machine and with no keys, this would be a challenge. I Googled "how to pick a lock" and learned the basic theories involved, all while getting red flagged by various law enforcement agencies. About an hour of experimenting, jiggling and jabbing at the lock with paperclips and tiny screwdrivers, I got the coin door open!  I immediately took the lock off the door and made a note to add a new one to my shopping list. Two in fact - the back box needed a new one as well.

I knew from my previous machines how to get the lock bar off and slide the glass out, but it took a minute to figure out that there's a second lever inside the machine. I pulled to release it and the playfield and lifted right up.


I was surprised to find it relatively clean! Just a few cobwebs in the corners, some dust, and bits of stale popcorn, along with a handful of loose bulbs, washers and nuts rolling around on the bottom.  I can't wait to explore around and figure out what all this does. 


The underside of the playfiled was also relatively clean for a 40+ year-old game and I just spotted a few places that would need attention.  With the machine open I could start making a shopping list and come up with a plan for getting everything in proper working order!


Tuesday, December 16, 2014

Assessment: Part 1


When I got my new project home, I immediately set it up in my kitchen - really the only place in my small home where it would fit. I had an opportunity to look it over and play it before the auction, so I mostly knew what I was getting into.  Here are the pros:
  • The cabinet seems sturdy and will be easy to re-finish.
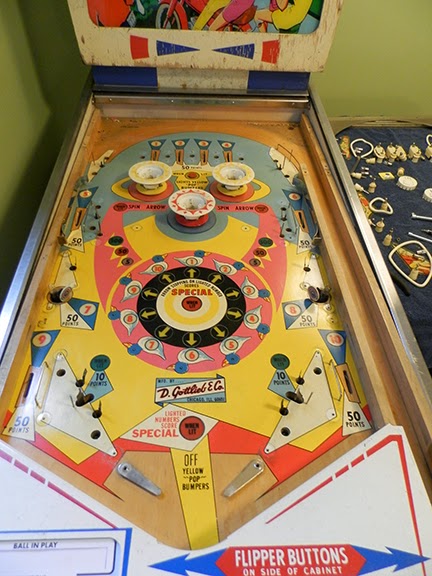
  • The playfield is just dirty and the colors aren't faded too badly. There are no major wear spots.
  • All the plastics are present and intact with no broken corners.
  • The back glass is flawless and the artwork is beautiful.
  • All the chimes and score reels are intact and working.
Here are the cons:
  • The coin door is badly beat up - someone did some damage trying to bust it open at one point.
  • There are no keys, so I couldn't look inside.
  • The left flipper is working but broken and will have to be replaced.
  • The graphics on the pop bumpers are faded - purely a cosmetic issue.
  • I noticed a couple of mechanical issues, but they seem relatively minor.
  • About half of the bulbs are burned out.
  • The tilt mechanism is way too sensitive, making it impossible to finish a game.
  • All the rubber parts need to be replaced - especially the rebound rubber, which looks original.
  • The flipper solenoids buzz whenever activated, which makes me nervous.
I have a lot of work ahead, but clearly, the pros outweigh the cons here. Most everything wrong with the machine looks easy to fix. I have to admit to a little bit of buyer's panic after getting the machine home and considered trying to unload it right away, but after living with it for a few days, I've calmed a bit and have come up with a plan of action for the project:

  1. Get the machine back into working mechanical shape
  2. Re-finish the cabinet
  3. Put it up for sale
I've also decided that if I can't find a buyer, I'd re-theme the machine into a one-of-a-kind pin by creating new playfield and back glass art.

Here are a few photos of the machine in "Before" condition:


Sunday, December 14, 2014

The New Project Begins

On December 6th, 2014 I bought a 1968 Gottlieb Fun Land pinball machine at a local auction for well under my budget, with plans to fix it up. This is my third pinball machine - I bought a Data East Rocky & Bullwinkle at the same auction about 18 months before and then bought my dream machine, a Williams Tales of the Arabian Nights, about eight months later from a seller online.

I've learned a lot from these machines but the most important thing I've discovered is that I'm far better at dealing with mechanical issues than I am with circuit boards. So that's why, for this project, I've chosen an electro-mechanical (EM) machine - no transistors, capacitors, opto sensors, or complicated dot matrix displays. Fun Land works on magnets, levers, simple solenoids and relay switches, and those I can handle.  To simplify things further, I even made sure to find a one-player game with four score reels, so I'd have fewer components to deal with.

With a little help, I disassembled the machine and loaded it into my tiny Yaris.